|
Thank you for rating this answer.
|
This procedure is not meant to supplant or supersede documentation or best practices from Microsoft. If you find a discrepancy between this procedure and documentation or best practices from Microsoft, follow the documentation or best practices from Microsoft.
This procedure guides you through one way to backup a WinSPC database running on Microsoft SQL Server 2008 Express or SQL Server 2005 Express. The screen shots you will see are from SQL Server 2008 Express but they differ little from what you would see in SQL Server 2005 Express. (If and when you want to restore the backup, reference the knowledge base artice titled How do I restore my backed-up WinSPC database if I'm running Microsoft SQL Server Express?)
- Launch Microsoft SQL Server Management Studio.
- In the Connect to Server prompt that appears:
- At Server Type, select Database Engine.
- At Server Name, specify the computer name on which your WinSPC database resides and the name of the instance which is used by WinSPC, separating these two names by a backslash (\). (The default instance name for both SQL Server 2008 Express and SQL Server 2005 Express is SQLEXPRESS.)
- At Authentication, select SQL Server Authentication.
- At Login, specify sa.
- At Password, enter the password for sa that was supplied when SQL Server Express was installed.
- Click Connect.
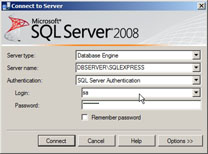
- If the Object Explorer is not displayed, select Object Explorer from the View menu.
- If the Databases folder is not visible beneath the server\instance name in the Object Explorer, double-click the server\instance name.
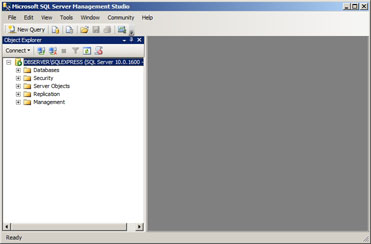
- Double-click the Databases folder and as many of its subfolders as necessary to expose the folder in which your WinSPC database resides.
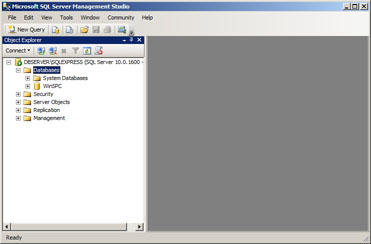
- Right-click your WinSPC database folder and, in the submenu that appears, select Tasks > Backup.
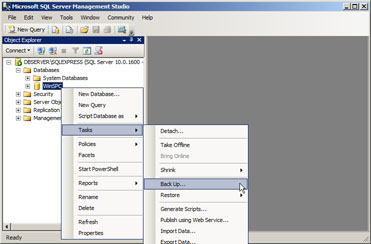
This causes the Back Up Database dialog box to appear.
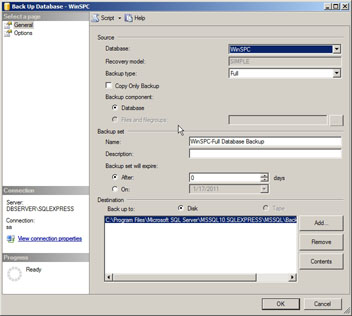
- In the Back Up Database dialog box, under Source:
- At Database, select your WinSPC database.
- At Backup Type, if you are backing up your WinSPC database so you can send the backup to DataNet's help desk, select Full. This results in the full database being backed up, which is what the help desk will need. Otherwise, if you prefer, select Differential. Selecting differential backs up only that data which has changed since the last full backup.
- Ensure the Copy Only Backup check box is unchecked.
- At Backup Component, ensure Database is selected.
- Still in the Backup Database dialog box, under Backup set:
- At Name, if the default name for the backup file is unacceptable to you, provide an alternative name.
- At Description, if desired, enter a note that describes the backup.
- At Backup set will expire, accept the After: 0 days default, which means that the backup set will never automatically expire, or specify when you want the backup set to expire. (Expire, in this case, means allowing the database set to be overwritten.)
- Still in the Backup Database dialog box, under Destination, if the default destination for the backup file is unacceptable to you, provide an alternative destination.
- In the top left of the dialog box, under Select a page, click Options. This causes the Options tab to be displayed.
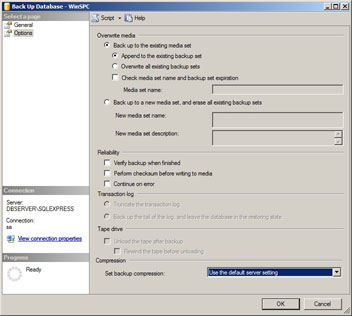
- On this Options tab, under Overwrite media, select one of the following two options:
- Back up to the existing media set: This option results in the backup being made to whatever media set is currently in use. (A media set is simply the set of storage media used for a backup.)
- Back up to a new media set, and erase all existing backup sets: This option results in the backup being made to a media set other than the one currently in use and the erasure of any backup sets currently on that new media set.
- If, in the preceding step, you selected Back up to the existing media set:
- Select Append to the existing backup set if you want the new backup set to be added onto the end of the existing backup set. This option results in no overwriting.
- Select Overwrite all existing backup sets if you want any backup sets currently on the existing media set to be deleted and replaced by the new backup set.
- If you want to have the backup operation check and verify the name of the media set and the specified expiration date for the backup sets before beginning the backup, check the Check media set name and backup set expiration check box and then, in the Media set name text box that becomes enabled, enter the name of the existing media set.
- If, in step 11, you selected Back up to a new media set, and erase all existing backup sets:
- At New media set name, enter the name of the new media set to be used.
- At New media set description, if desired, enter a description of the new media set.
- Under Reliability, if you want to specify additional options, check the appropriate check boxes. For an explanation of the available options, click Help at the top of the dialog box.
- Click the dialog box's OK button.
- Allow the progress indicator in the dialog box's lower left corner to reach 100%.

- When a message appears indicating the backup completed successfully, click its OK button.

- Exit Microsoft SQL Server Management Studio.
|