 Search the WinSPC Knowledgebase Search the WinSPC Knowledgebase |
 Browse by Category Browse by Category |
|
|
|
|
|
| How do I restore my backed-up WinSPC database if I'm running Microsoft SQL Server Express? |
|
Thank you for rating this answer.
|
This procedure is not meant to supplant or supersede documentation or best practices from Microsoft. If you find a discrepancy between this procedure and documentation or best practices from Microsoft, follow the documentation or best practices from Microsoft.
This procedure guides you through one way to restore a backup of a WinSPC database running on Microsoft SQL Server 2008 Express or SQL Server 2005 Express. (To create such a backup, reference the knowledge base artice titled How do I backup my WinSPC database if I'm running Microsoft SQL Server Express?)
- Launch Microsoft SQL Server Management Studio.
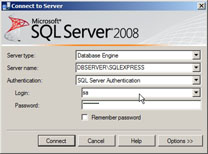
- In the Connect to Server prompt that appears:
- At Server type, select Database Engine.
- At Server name, specify the computer name on which your WinSPC database resides and the name of the instance which is used by WinSPC, separating these two names by a backslash (\). (The default instance name for both SQL Server 2008 Express and SQL Server 2005 Express.)
- At Authentication, select SQL Server Authentication.
- At Login, specify sa.
- At Password, enter the password for sa that was supplied when SQL Server Express was installed.
- Click Connect.

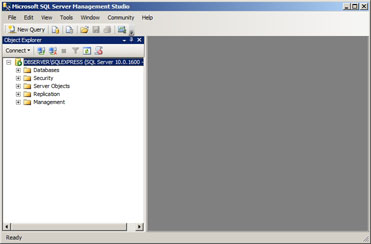
- If the Object Explorer is not displayed, select Object Explorer from the View menu.
- If the Databases folder is not visible beneath the instance name in the Object Explorer, double-click the instance name.

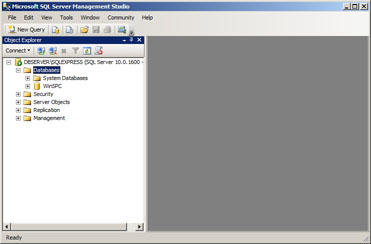
- Double-click the Databases folder and as many of its subfolders as necessary to expose the folder for your WinSPC database.

- Right-click your WinSPC database folder and, in the submenu that appears, select Tasks > Restore > Database.

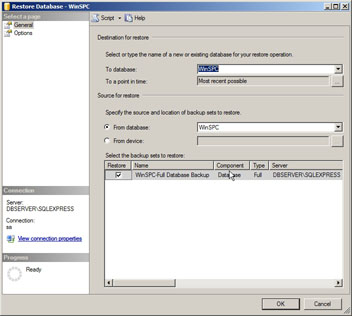
This causes the Restore Database dialog box to be displayed.

- In this Restore Database dialog box, under Destination for restore:
- At To database, if you want to overwrite your existing WinSPC database with the backup, specify the name of your WinSPC database. Otherwise, specify another database or enter a new database name.
- At To a point in time, if you want the database restored to the date and time the backup was created, accept the Most recent possible default. In most cases, this will be the appropriate option. For an explanation of other options, consult your DBA or click Help at the top of the dialog box.
- Still in the Backup Database dialog box, under Source for restore, if the server on which the backed-up database resides is the server on which the new or exiting database specified in the preceding step resides, select From database and specify the name of the backed-up database. Otherwise, select From Device, click the ellipsis button and, in the Specify Backup dialog box that appears, specify the media and location of the backup.
- Under Select the backup sets to restore, select the specific backup sets within the backed-up database that you want restored.
- In the top left of the dialog box, under Select a page, click Options. This causes the Options tab to appear.

- On this Options tab, under Restore options, if you would like to specify one or more additional options for the restore operation, do so by checking the appropriate check box(es). Often, users like to check the Overwrite the existing database check box. This option results in the files of the database named in the To database field (see step 7 above) being overwritten. (For an explanation of the available restore options, click Help at the top of the dialog box.)
- Still on the Options tab, under Recovery state, select the desired option for the state of the recovered backup sets. In most cases, the first option, which is the one selected by default, is accepted. (For an explanation of the recovery state options, click Help at the top of the dialog box.)
- Click the dialog box's OK button.
- Allow the progress indicator in the dialog box's lower left corner to reach 100%.

- When a message appears indicating the backup completed successfully, click its OK button.

- Exit Microsoft SQL Server Management Studio.
|
| Attachments |
|
No attachments were found.
|
| Visitor Comments |
|
No visitor comments posted. Post a comment
|